How to spec and quote a custom cable assembly.
- published
- 2026-11-07
- read_time
- 10 min
- author
- Wave2Wave Engineering Team
- reviewer
- Mark Crandon, CEO
What to send for an accurate custom cable quote the first time, field by field, with real drawings.
A custom cable assembly is quoted from its details: how many cables, how long each one is, what is on each end, how they are labeled and bundled, and how they are tested. When a request includes these, the quote comes back faster and matches what you build. This guide lists what to send, shows two of our engineering drawings with every item marked, and explains each field.
- What the cables are for, and how many sets you need now and later
- The layout: devices per rack, connections per device, where each cable starts and ends
- A length and port-map list, one row per cable (this affects price the most)
- Cable type: fiber type and count, or copper category and gauge
- Connectors on each end, with polish, gender and polarity for fiber
- Colors, per cable or per group
- Label text and where labels go (usually both ends)
- How the bundle is built: covering, breakout lengths, staggered or fixed
- The test reports and quality documents you need
- Required ship date and ship-to location
A drawing helps but is not required. A spreadsheet or a few clear sentences is enough to start, and we produce the drawing.
Download the checklist
A printable one-page spec checklist to fill in or forward to your team. The example drawings are a PDF too.
01What a finished spec looks like
This is a production drawing for a 12-cable Cat6 bundle, shown with customer details removed. A finished spec answers every numbered item. If you can answer them in your request, the quote can be exact.
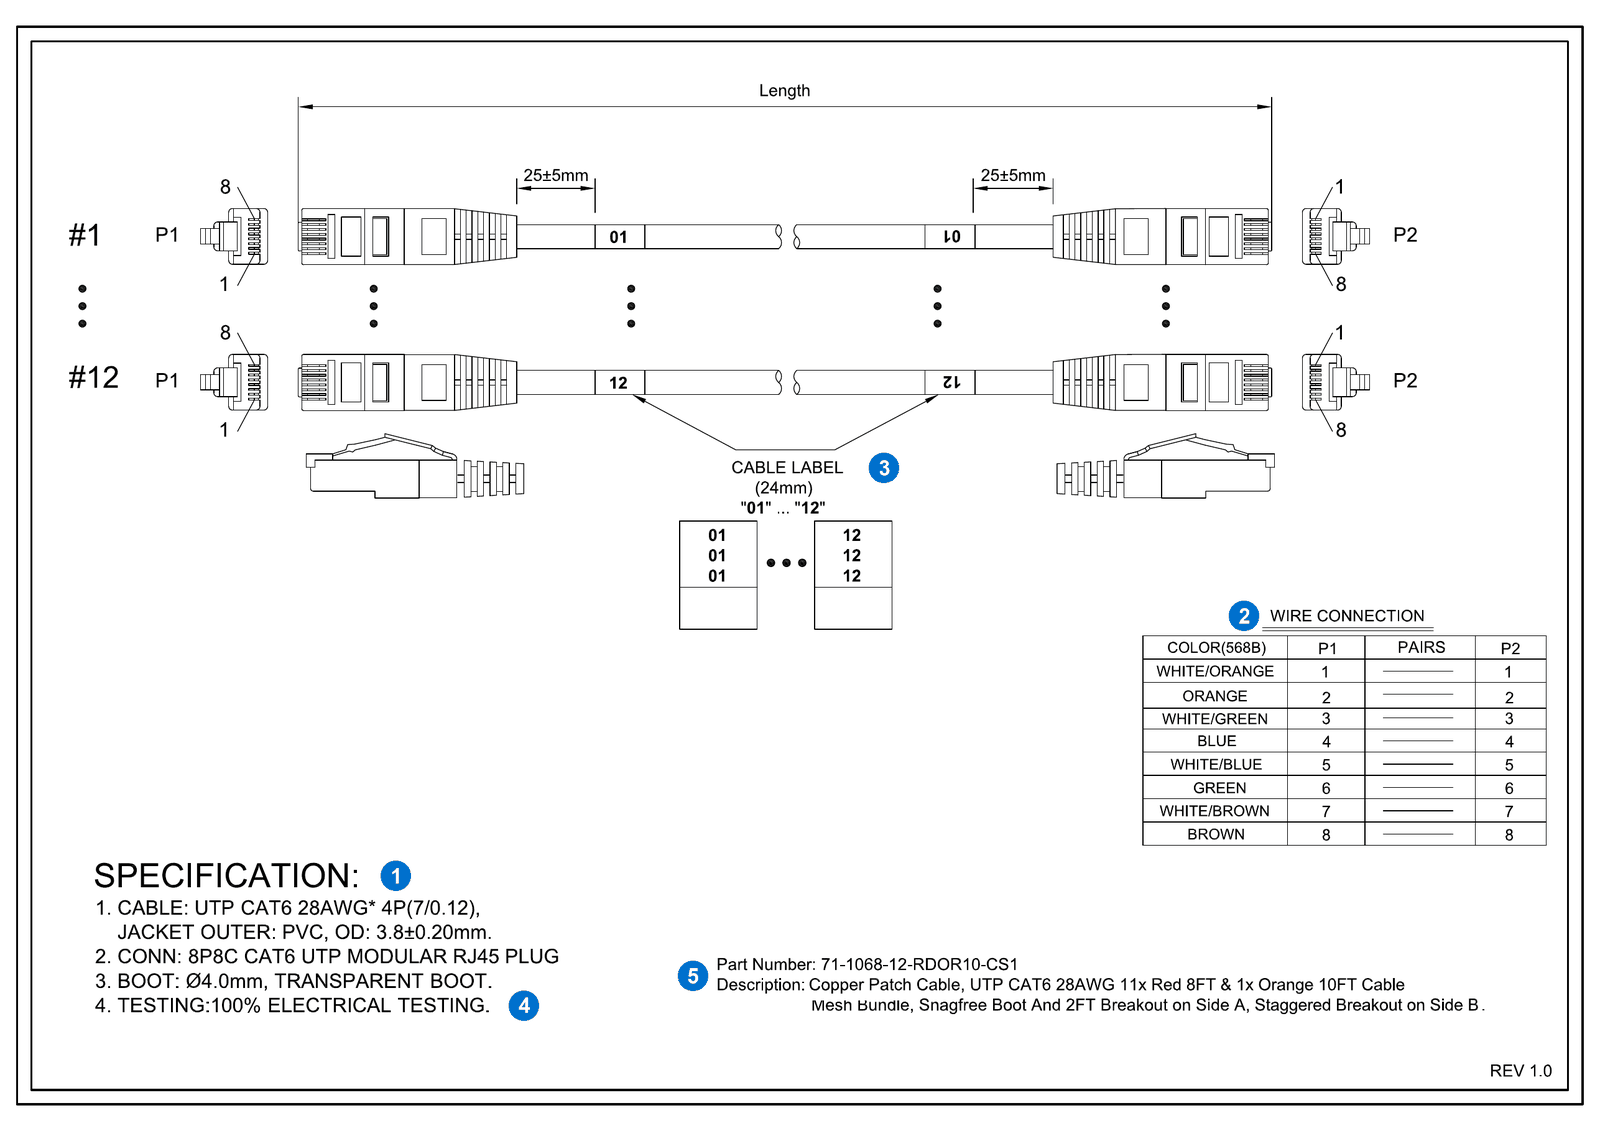
| # | Item | What this drawing says |
|---|---|---|
| 1 | Cable and connector | UTP Cat6, 28 AWG, 4 pairs stranded, PVC jacket 3.8 mm outer diameter; 8P8C RJ45 plug; 4.0 mm transparent boot |
| 2 | Wire map | T568B on both ends, pin 1 to pin 1 through pin 8 (straight-through) |
| 3 | Cable label | 24 mm label printed 01 to 12, on both ends, 25 mm (plus or minus 5) from the boot |
| 4 | Testing | 100% electrical testing |
| 5 | Part number and description | One line that states the whole build, so the order, drawing and bag label match |
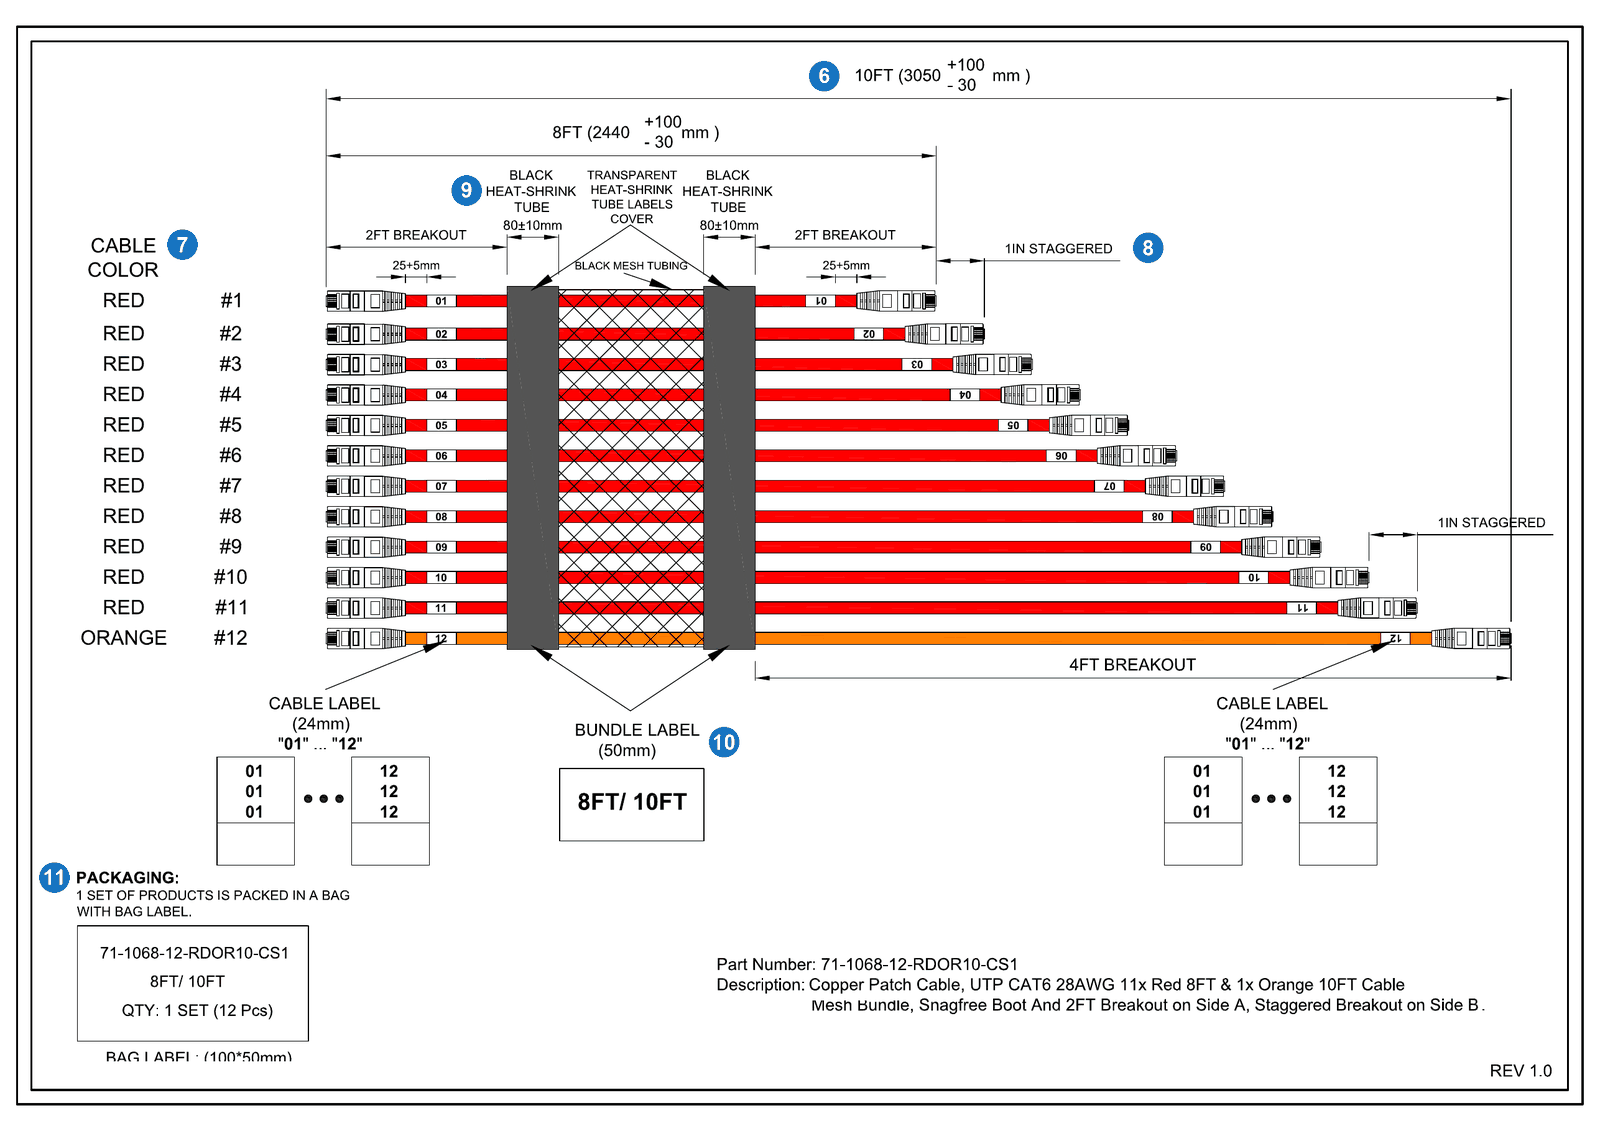
| # | Item | What this drawing says |
|---|---|---|
| 6 | Lengths and tolerance | 8 ft (2440 mm) and 10 ft (3050 mm), each plus 100 mm or minus 30 mm |
| 7 | Colors and cable numbers | Cables 1 to 11 red, cable 12 orange |
| 8 | Breakouts | Side A: every cable breaks out 2 ft from the trunk. Side B: staggered, each cable 1 inch longer than the one before; the orange cable breaks out 4 ft |
| 9 | Trunk build | Black mesh tubing, closed with 80 mm black heat-shrink at each end, with a clear heat-shrink cover over the bundle label |
| 10 | Bundle label | 50 mm label showing the lengths, 8FT / 10FT |
| 11 | Packaging | One set per bag, with a 100 x 50 mm bag label: part number, lengths and quantity |
02Start with what you already have
You do not need to write a spec from scratch. Send what your team already uses: a CAD drawing, a DCIM or port-map export, a spreadsheet of cable runs, a photo of a sample with notes, or a plain description. The contact form takes up to 5 files of 5 MB each. PDF, Word, Excel, CSV and text files upload most reliably; for CAD files, attach a PDF export or email the originals to info@wave2wave.io.
What a complete request looks like
An example: a team connecting six new racks to the main distribution area. Every line answers a question we would otherwise have to ask.
- Six fiber trunks now, one per rack, with pricing for 6 and for 12 in case the second row goes ahead
- Each trunk runs from a patch panel in the main distribution area to a cassette at the top of one rack, in overhead tray
- A run list with one length per trunk, from 18 to 42 m, measured along the tray route
- 24-fiber OM4, plenum, aqua jacket
- MPO-12 female on both ends, UPC, Type B polarity, to match the existing panels and cassettes
- Labels on both ends with panel and rack position, for example MDA-P03 to R07-U42
- A pulling eye on the rack end, removed after the pull
- An insertion loss report for each trunk, matched to its serial number
- Delivery to the site in four weeks, packed and labeled by rack
What often goes missing: final lengths, because the tray route has not been walked yet, and the label scheme. Lengths set the price, so they are usually the first question back.
03The spec, field by field
Fiber
| Field | What to state | Example |
|---|---|---|
| Fiber type | Single-mode OS2, or multimode OM3, OM4 or OM5 | OM4 |
| Fiber count | Fibers per cable and per connector | Two 24-fiber cables, six 12-fiber MPO connectors |
| Connectors | The connector on each end: MPO, LC, SC, SN, CS or MMC, simplex or duplex | Side A MPO, side B LC duplex |
| Polish | UPC (domed, straight) or APC (8 degree angle). The two must never be mated | APC for single-mode MPO |
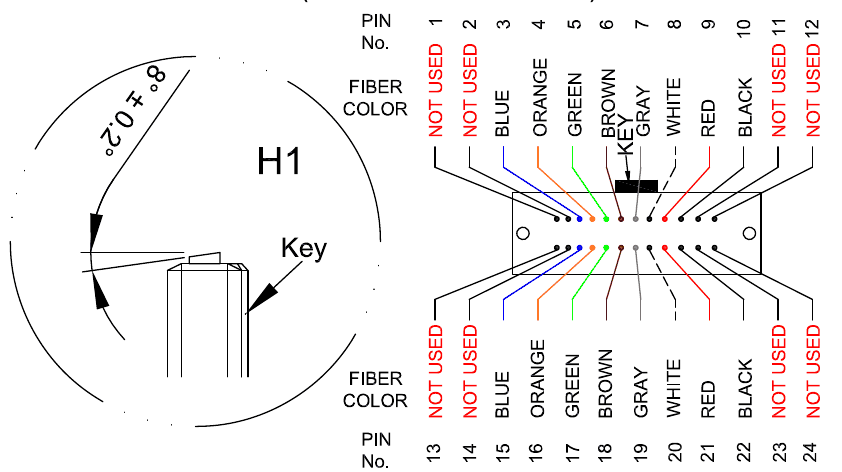
| MPO gender | Male (pinned) or female (unpinned) on each MPO end. Every MPO connection needs one of each | Female, to plug into a pinned panel |
| Polarity | Type A, B or C, or a fiber map if you use your own | Type B |
| Breakouts | Breakout length on each side, staggered or fixed, leg tube size | 1 m on side A, 2.6 m on side B |
| Jacket | Rating (riser, plenum or LSZH), color, outer diameter if it matters | Blue plenum, 3.0 mm |
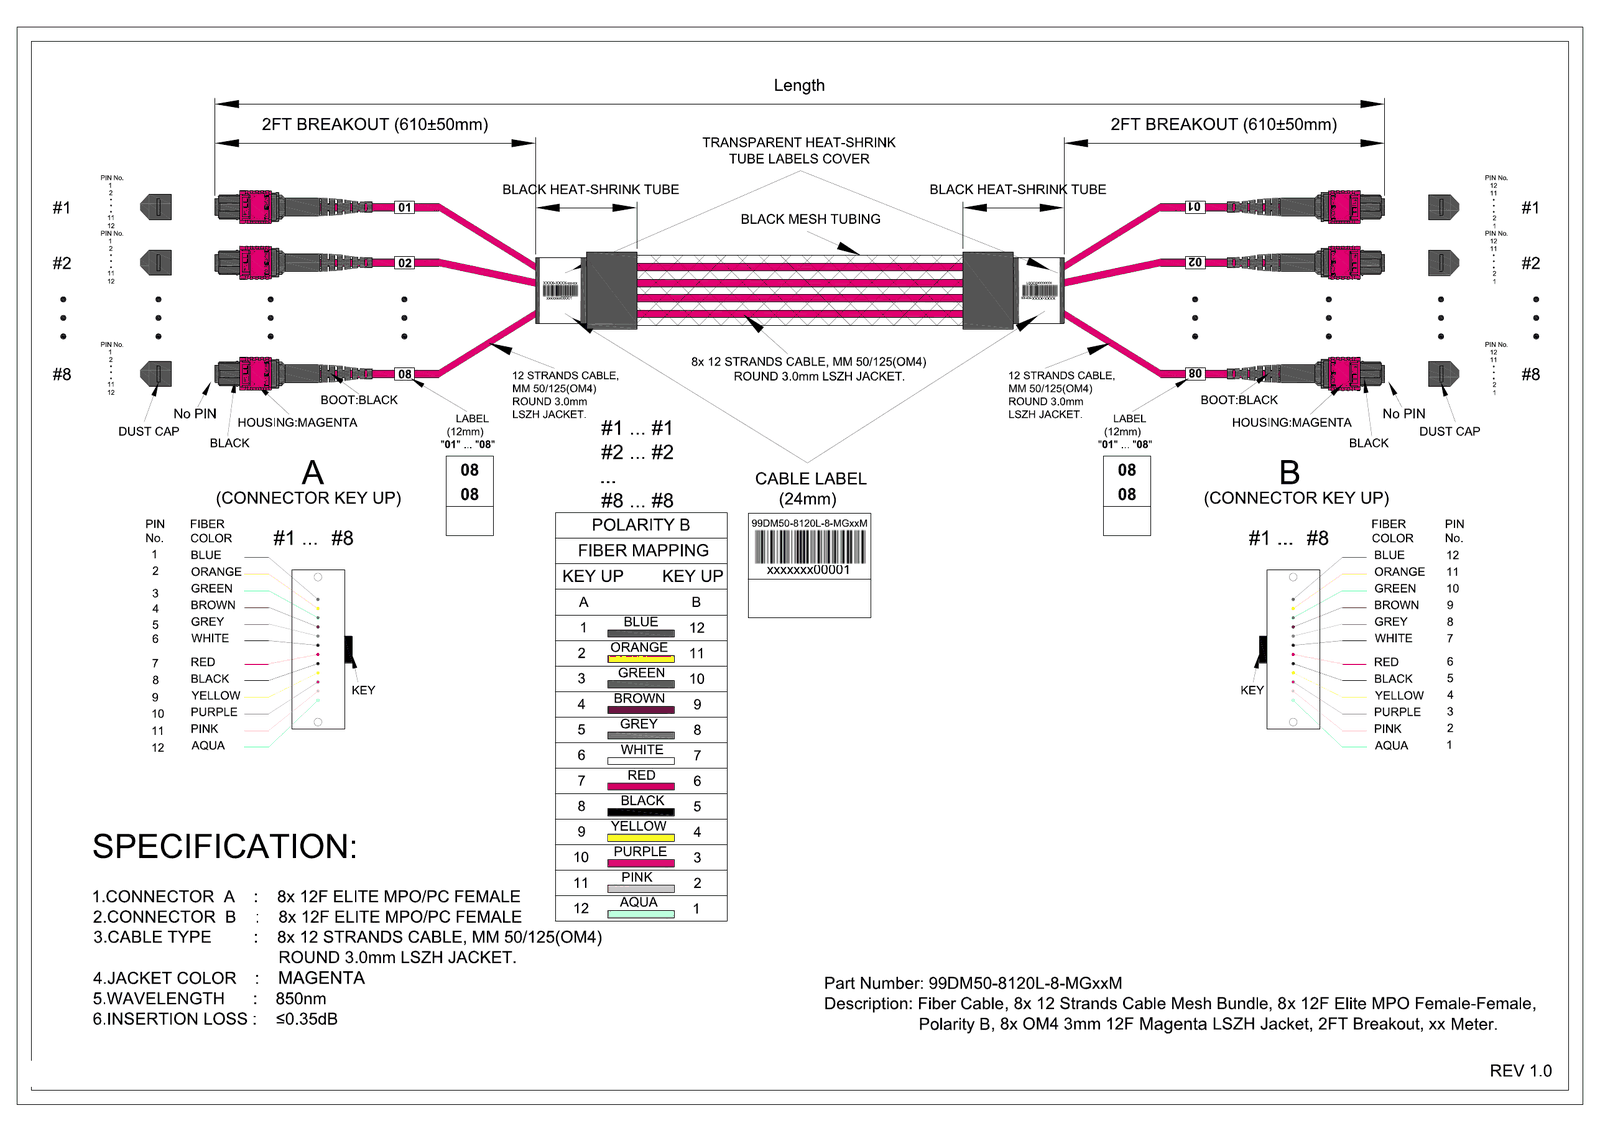
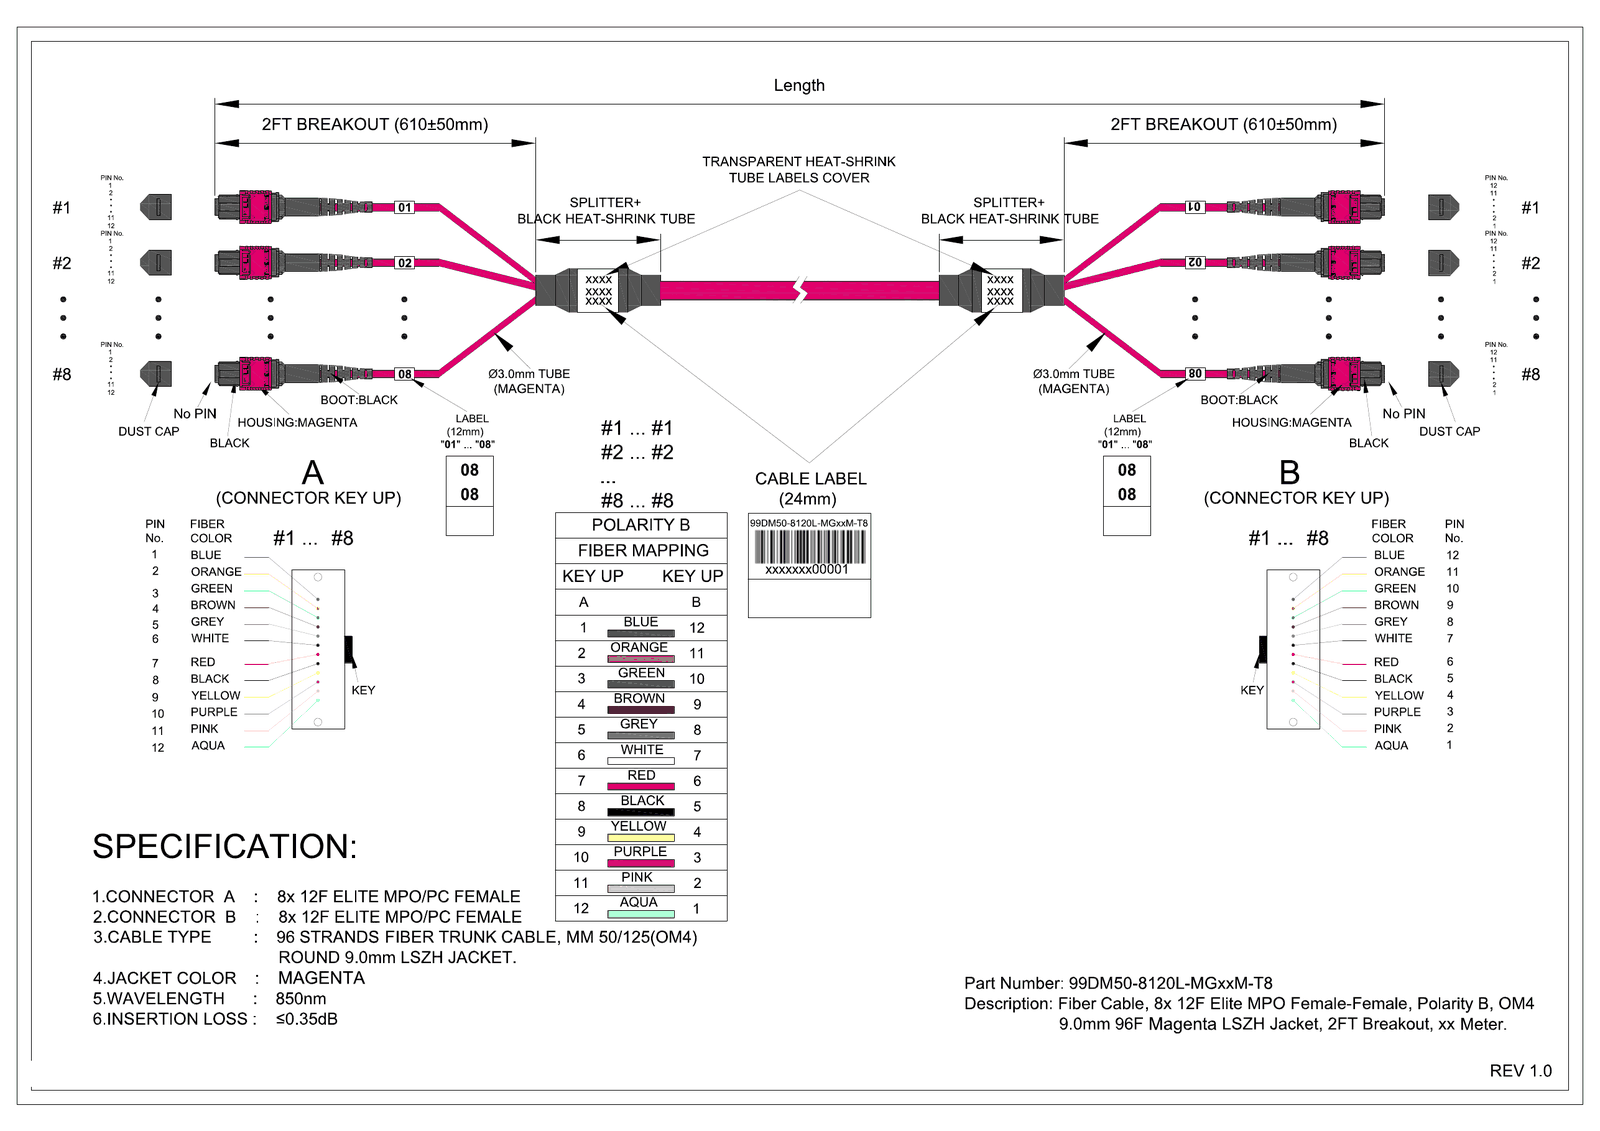
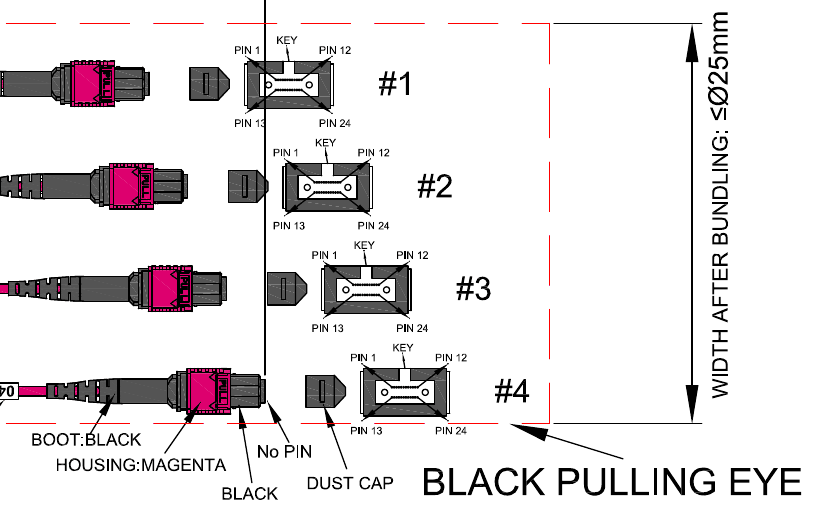
| Construction | Separate cables in a mesh bundle, or one trunk cable; armored; pulling eye | Mesh bundle of eight 12-fiber cables |
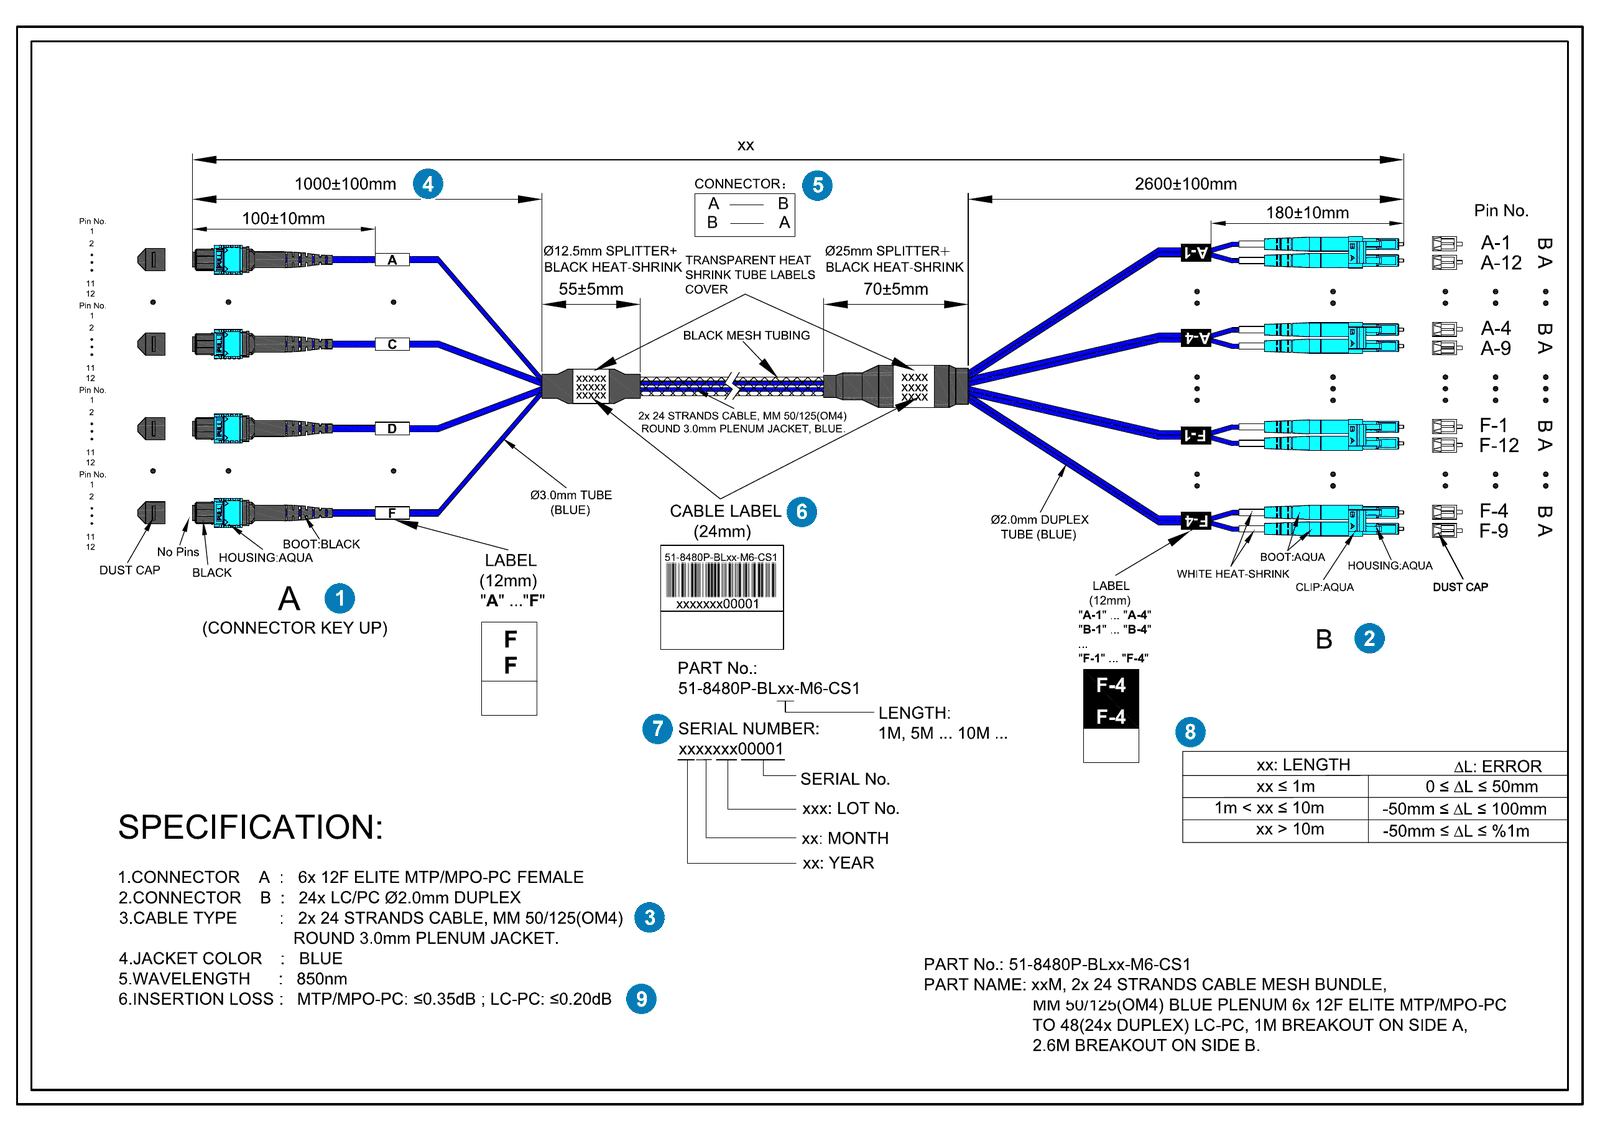
| # | Item | What this drawing says |
|---|---|---|
| 1 | Side A connectors | Six 12-fiber MPO, female (no pins), connector key up, aqua housing |
| 2 | Side B connectors | 24 duplex LC/PC, 2.0 mm, aqua; legs labeled A-1 to F-4; each duplex crossed A to B |
| 3 | Fiber type and cable | Two 24-fiber OM4 cables, 3.0 mm round plenum jacket |
| 4 | Breakout lengths | 1000 mm on side A and 2600 mm on side B, each plus or minus 100 mm |
| 5 | Polarity | The A and B fibers of each LC duplex are crossed so transmit meets receive; page 2 of the drawing maps every MPO fiber to its LC leg |
| 6 | Cable label | 24 mm label with part number, barcode and serial number |
| 7 | Serial number | Encodes year, month and lot, so each assembly can be traced |
| 8 | Length tolerance | Up to 1 m: 0 to plus 50 mm. 1 to 10 m: minus 50 to plus 100 mm. Over 10 m: minus 50 mm to plus 1% |
| 9 | Insertion loss | MPO/PC 0.35 dB or less; LC/PC 0.20 dB or less |
Construction is a separate choice from connectors
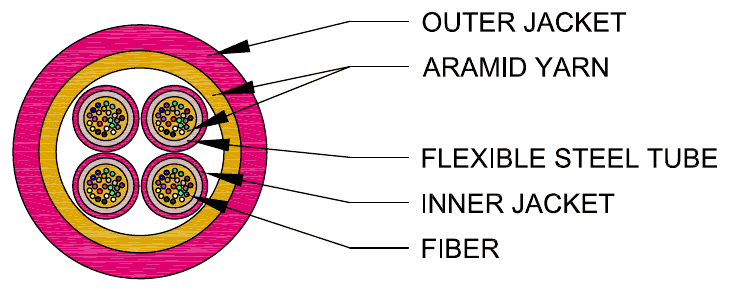
These two assemblies have the same ends, eight 12-fiber MPO female connectors on each side with Type B polarity on OM4. One is built as a mesh bundle of eight 12-fiber cables; the other as a single 96-fiber trunk with splitters. Say which you want, or describe the pathway and ask.
Details worth stating
Copper
| Field | What to state | Example |
|---|---|---|
| Category | Cat6, Cat6A or slim Cat6A | Cat6 |
| Conductor | Gauge, solid or stranded, bare copper | 28 AWG stranded |
| Shielding | Unshielded (UTP) or shielded | UTP |
| Connector and boot | Plug type and boot style | RJ45, snag-free transparent boot |
| Wire map | T568A or T568B, straight-through or crossover | T568B straight-through |
| Jacket | Rating, color, outer diameter if it matters | PVC, red, 3.8 mm |
Power
State the plug and connector on each end, the wire gauge, the jacket color, and the country or region where the cords will be used.
04Lengths and tolerances
Length drives material and price, so give one length per cable, not a range. In a rack harness, list each cable by rack unit and port, with its length. If lengths are still being finalized, say so and send what you have; the first questions back will be about the lengths.
Every drawing states a tolerance. The examples above use plus 100 mm or minus 30 mm on the copper bundle, and a tolerance that grows with length on the fiber bundle. If your design needs a tighter one, put it in the request.
05Labels, bundling and packaging
- Label text. What each label says: a cable number, the two port names it connects, a rack position, or your own scheme.
- Label position. Usually both ends, a fixed distance from the boot. The copper example uses 25 mm.
- Bundle and leg labels. A label on the trunk, and on each breakout leg of a fiber harness.
- Barcodes and serial numbers. If you scan assets at install, say which format.
- Packaging. One set per bag, or packed by rack, row or install phase, with what the bag label shows.
More on factory labeling and kitting by rack or phase.
06Testing and reports
Say which test results you need to receive, since that decides what is recorded and shipped with the order. In the examples above, the copper bundle is 100% electrically tested, and the fiber drawings set an insertion loss limit per connector type. On multimode: 0.35 dB or less for MPO/PC and 0.20 dB or less for LC/PC. On the single-mode APC assembly: MPO/APC 0.70 dB or less with return loss of 55 dB or more, and SC/APC 0.30 dB or less with return loss of 60 dB or more.
If your project requires a particular test, such as copper channel certification or an OTDR trace on long fiber runs, name it in the request so it is in the quote.
07Quantities, pilots and lead time
There is no fixed minimum order. Many projects start with a small pilot, a few sets to check fit in the rack, then move to production. Ask for pricing at each quantity you are considering, for example the pilot and the full rollout.
Lead time depends on the size of the order and the materials, typically 2 to 4 weeks. The quote states the lead time for your build, so include your required ship date.
08What happens after you send it
- We reply within 24 hours and ask about anything missing.
- We draw the assembly, like the examples above, so we agree on every detail before production.
- You get a detailed quote with lead times, typically within 2 to 3 business days.
- You place the order, and production starts.
09What slows a quote down
- Lengths given as a range, or still being decided. Price depends on the exact lengths.
- No label text, or no decision on where labels, breakouts and wraps go.
- Polarity or MPO gender not stated, or not matched to the panels and optics at each end.
- UPC and APC mixed in one link. They cannot be mated.
- No quantity, or only one quantity when you will order more later.
- Side A and side B not defined, so breakout lengths and labels cannot be placed.
10Frequently asked questions
What do I need to send to get a custom cable quote?
What it is for and how many sets, a length and port-map list, cable type, connectors on each end, colors, label text, how the bundle is built, the test reports you need, and your ship date.
Is there a minimum order quantity for custom cable assemblies?
No fixed minimum. We build anything from a few sets for a pilot to full production runs, and a small first order to check fit is welcome.
Do I need an engineering drawing to request a quote?
No. A spreadsheet, port map, sketch or plain description works. We turn it into an engineering drawing so we agree on every detail before production.
Can I get pricing at more than one quantity?
Yes. Ask for each quantity you are considering, for example a small pilot and the full rollout, and we quote each one. Exact lengths are what make the price accurate.
How fast will I get a quote?
We reply within 24 hours and send a detailed quote, with lead times, typically within 2 to 3 business days. A complete length and port-map list keeps it on that schedule.
Ready to send your spec? Request a quote and attach your drawing or spreadsheet, or download the checklist first.
Ready to request a quote?
Attach your drawing, spreadsheet or port map, or describe the job in a few lines. We reply within 24 hours.